Thursday, April 2, 2020
Face Mask with Pocket
This mask is designed with 3 layers, an outside mask, a lining layer and a pocket where a filter or additional fabric can be inserted. Cut 2 mask squares 7 x 8 ½”. Cut 2 pocket squares 4 ½ x 5 ½”.(The 5 ½” is used as the height of mask nose to chin).
2 – 7 ¼” pieces of elastic or ties aprox. 14 to 16”. One piece of wire aprox. 3 1/3”. (I used florist wire 7 ¼” folded in half and twisted to make it thicker.) A size 14 or jeans needle is a good size for this.
All Seams are 1/4 Inch
Sew 2 pocket squares right sides together leaving an opening in the center to insert a filter.
Press seam open. This unit should be 5 ½” x 8 ½”. Topstitch 1/8” each side of seam to hold raw edges down.
Center pocket on top of one mask square, both right sides up.
Layer the second mask square on top right sides together.
Stitch all four sides of square leaving a couple of inches free for turning. Turn right side out and press.
Sew both pieces of elastic to each short side as shown. Your sewing the elastic just to the outside edges of pocket.
Fold the long edges over the raw edges of the pocket. Insert the wire in the center of one of the sides before you start sewing. Sew close to the inside edge making sure you are covering the pocket raw edges.
Create 2 or 3 pleats on the short sides of the mask. Make sure pleats are going the same direction on both sides.
Stitch down short sides securing pleats and elastic. Stitch over first stitching for extra strength.
If you need to use ties instead of elastic cut your fabric 1 1/2" wide by the length you desire. I make mine aprox 16". With wrong side up press each long edge to center.
Press in half and sew close to edge.
Your done!
Friday, March 24, 2017
Sunday, March 12, 2017
Friday, April 15, 2016
Saturday, April 2, 2016
From Tired to Terrific!
If you love to sew here is another way to express your creativity! I have taken an old tired chair and turned it into a beautiful accent piece. Using Dixie Belle Chalk paints it's easy. No sanding just start painting! I've added a finished quilt block for the seat of this chair but if you are not a sewer just get some beautiful fabric and cover your seats. Find Dixie Belle at Cotton Creations Fabric.
Sunday, December 20, 2015
Saturday, November 28, 2015
Here are blocks 7 and 8 of the Moda Shuffle Free Patterns. You can visit our website www.cottoncreationsfabric.com to see blocks 9 and 10 this week. Visit our Free Patterns page. Don't forget to checkout the tips and techniques for sewing these quilt blocks.
Sunday, November 22, 2015
Be are rolling right along with our Moda Shuffle Free patterns. Here are blocks 5 & 6 if you missed them on our website. Visit our site the week of 11/22/2015 for the full size patterns for 7 and 8. www.cottoncreationsfabric.com
Check out our recent blogs for the rest of the blocks that you might have missed. Make this great quilt with all the blocks that you collect.
Monday, November 16, 2015
More from the Moda Shuffle:
Here are blocks 3 and 4 of the Free Moda Shuffle patterns if you missed them on our website.
Be sure to check our website, www.cottoncreationsfabric.com to find PDF's of this week's blocks.
Enjoy!
Here are blocks 3 and 4 of the Free Moda Shuffle patterns if you missed them on our website.
Be sure to check our website, www.cottoncreationsfabric.com to find PDF's of this week's blocks.
Enjoy!
Saturday, November 7, 2015
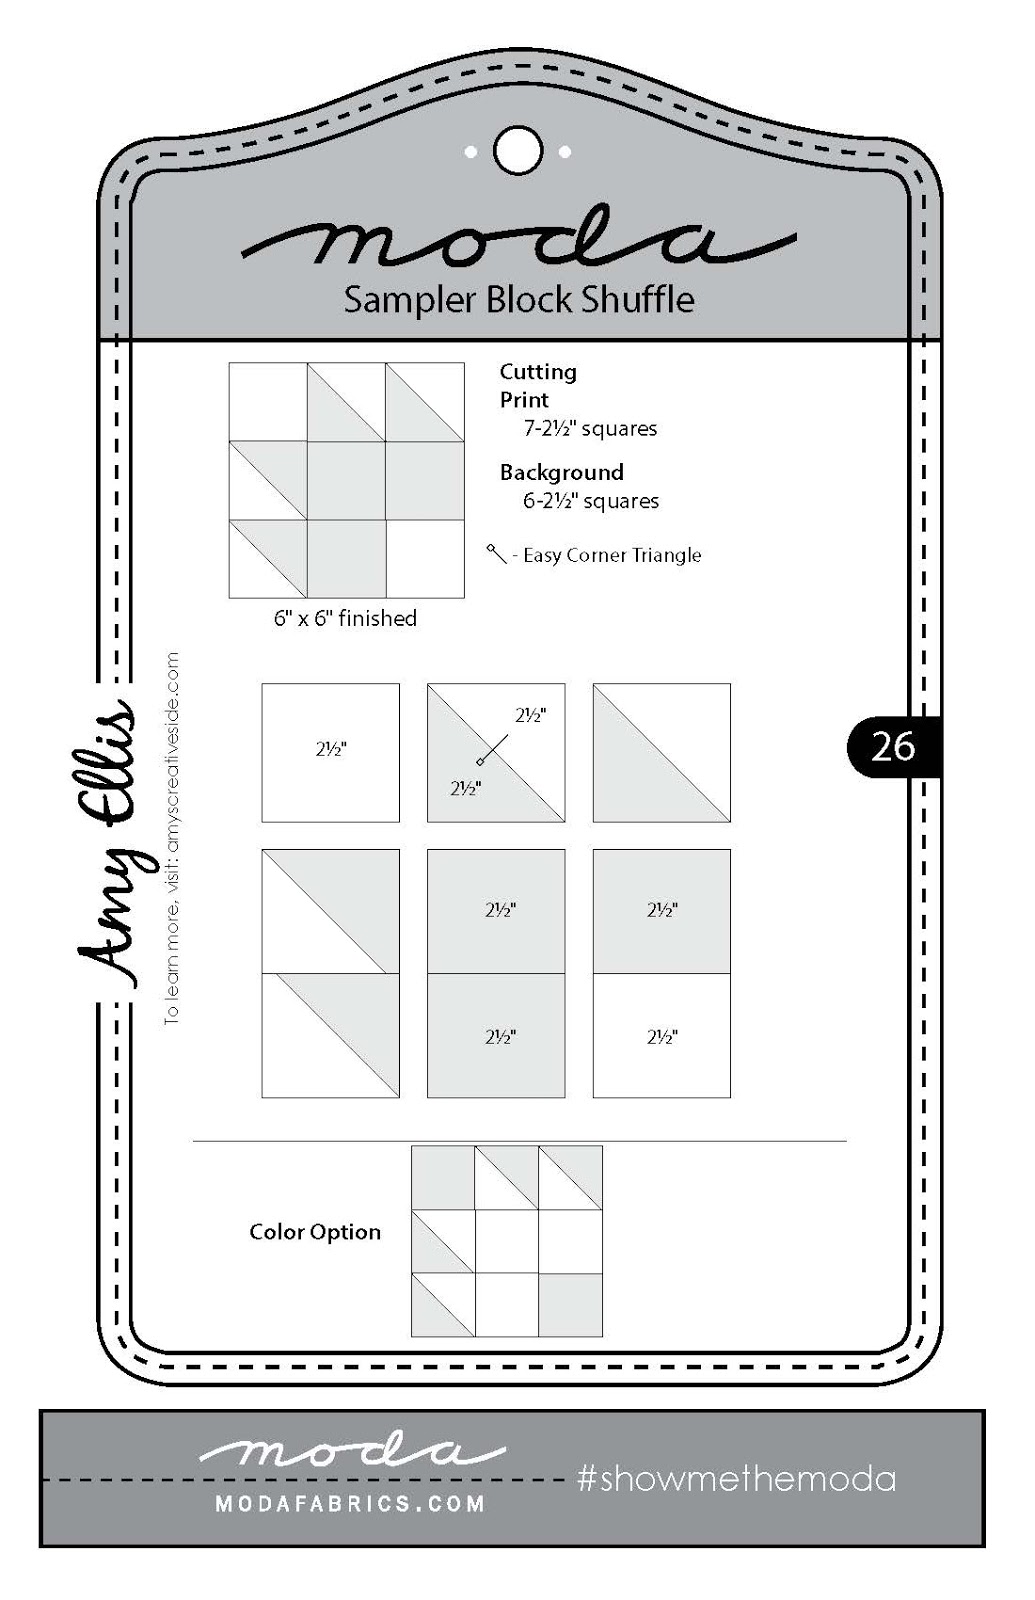
Moda has brought to us a great program using 30 Free blocks to create this beautiful quilt. Each week we will be adding a couple of new blocks to our website for you to download. November 8th we will post blocks 3 & 4 of this great collection. If you would like to download these blocks just go to our website www.cottoncreationsfabric.com and go to Free Patterns. These patterns will be available on our site the week of November 8th.
If you missed week one, here is patterns 1 & 2. Enjoy the Moda Shuffle!
Wednesday, May 13, 2015
Sew what's buzzing......... My family just finished up a wonderful weekend as my son got married. Here is a few of my creations I made for the wedding.
This money bag I embroidered as a memory bag for the bride and groom.
This ring bearer pillow was quick and easy to make. I embellished with pearl beads and ribbon.
This flower girl bib was sewn for my granddaughter. With meatballs on the menu this turned outto be a wise choice for me to sew.
Here is my little princess in the dress I made for her. She had sew much fun in it!
This money bag I embroidered as a memory bag for the bride and groom.
This ring bearer pillow was quick and easy to make. I embellished with pearl beads and ribbon.
This flower girl bib was sewn for my granddaughter. With meatballs on the menu this turned outto be a wise choice for me to sew.
Here is my little princess in the dress I made for her. She had sew much fun in it!
And of course I had to create a little something for myself. The purse is called the Special Occasion Bag. Sewn with Texture Magic to create the flap. Surprisingly easy and very fun to sew. I added a little bling to give it a vintage and elegant look.
Subscribe to:
Posts (Atom)